

4 Steps to Create a WooCommerce Booking Site

Do you want to create a WooCommerce booking site in WordPress?
An optimized booking website enables your clients to place their reservations online as well as schedule appointments.
If you’re running a hotel, salon, or any other kind of real estate agency, WordPress can help you manage all your bookings. Through WooCommerce and its extensions, setting up a WordPress-based booking site is a breeze. Allow clients to make reservations right from your website.
This blog post is going to highlight why you should include a booking system on your website. Also, it will show you how to build your WooCommerce booking site step by step.
The Benefits of Having an Online Booking Website
A smooth booking system will bring several benefits to your business. It’ll make your business automated and robust. Your potential clients will find an easy way to book services or appointments, no matter the time.
Moreover, this system will boost customer satisfaction as they’ll get quick and prompt service any time of the day.
Below, you’ll find other benefits of having an online booking website:
- Keep Your Business Open 24/7
- No Need to Attend Phone Calls
- Offload admin workload
- Minimize human error
- Ensure Secure and fast payments
Keep Your Business Open 24/7
You’re operating your business on online platforms. This makes your business accessible at all times for your customers. They can easily visit your website and make a reservation, while you can do other important things or just relax on the beach. By activating online booking, you can enable your customers to make bookings all day, all night, or at any time that is convenient for them. So your profit wheel keeps moving all the time.
No Need to Attend Phone Calls
An online booking system will help you solve many complex issues just by displaying the right information to your customers in real time. You can free your employees from receiving and answering calls by letting your clients make their preferred choice and creating a direct booking on your site. Rather, you can involve your team members in other tasks to uplift your services for better ROI.
Offload Admin Workload
As a business owner or marketer, you must handle many moving parts of your business. By getting an automated booking system, you can minimize many of your tasks and shift your responsibilities to the technology. While you’re even sleeping, people are coming to your site, selecting dates, making payments, and making reservations for their desired services. And you are earning from your booking site.
Minimize Human Error
While a person is responsible for answering people’s queries, providing them with essential information, and helping them make reservations, there is a high chance of making some mistakes. But if you leave some of the responsibilities to an automated system, it can reduce the possibility of unwanted errors or unpleasant situations.
Ensure Secure and Fast Payments
An optimized booking site lets you establish a smooth and secure way to accept client payments. You can integrate multiple payment gateways into your booking site so people can easily book their appointments or make reservations. Offering multiple payment options and smooth transactions significantly enhances your customer experience and ultimately boosts your revenue.
Optimized booking sites create the best way to receive payments from clients without any hassles. This includes linking many gateways for people to make appointments and reservations easily. When you offer different payment methods and carry out easy transactions, you will improve the customer experience.
There is intense competition in every business field now. Everyone aims at providing good services to their customers. An automated booking system may help you keep ahead of your competitors.
Are you afraid that creating an online platform that allows users to book easily is difficult?
The best news is that WordPress lets you build a functional appointment website without prior knowledge or technical skills.
4 Steps to Build Your WooCommerce Booking Site
As we’ve said above, WordPress provides a user-friendly interface and a wide range of themes and plugins to build a fully functional website and incorporate any niche-specific function.
To build an eCommerce site in WordPress, you can use WooCommerce. It requires only a few clicks to activate eCommerce functionalities on your site. Moreover, you’ll find many helpful booking extensions that will enable your users to make reservations on your WooCommerce site.
Also, there are many options to customize your booking site considering your brand and business requirements.
We’re assuming that you’ve already selected a domain name that resembles your brand and got your hosting from a reputed service provider. Now it’s time to start developing your booking site.
Then you have to install and configure your WordPress site. Luckily, most hosting providers nowadays have a one-click install feature for WordPress.
Next, follow the below steps to create a dynamic WooCommerce booking site in your WordPress:
Step 1: Install and Activate Your WooCommerce Plugin
Step 2: Install a WooCommerce-Compatible Theme
Step 3: Upload and Activate the WooCommerce Bookings Extension
Step 4: Create Bookable Products and Services
Step 1: Install and Activate Your WooCommerce Plugin
After installing WordPress, navigate to your dashboard and then download the WooCommerce plugin directly.
- From your WordPress dashboard, go to Plugins and click on Add New.
- Search for the plugin WooCommerce.
- Install the plugin and activate it.
After activating WooCommerce, you have to configure your WooCommerce site as per your requirements. Simply follow the setup wizard to configure basic eCommerce settings.
WooCommerce activates all eCommerce functionalities on your WordPress site instantly. But for appointment or reservation facilities, you have to integrate a booking extension into your site.
Step 2: Install a WooCommerce-Compatible Theme
Besides useful plugins, you also need a beautiful theme that compliments your WooCommerce booking site. By getting a visually appealing and well-optimized theme, you can easily create a positive first impression and drive customers’ attention.
Fortunately, WooCommerce supports a rich library of eCommerce themes in different niches.
To install a theme on your booking site, go to WP-Admin → Appearance → Themes.
Before activating any theme on your website, it’s better to check the preview. If you find the theme appropriate for your site, activate the theme immediately. However, WordPress lets you change your theme unlimitedly.
You’ll also find 1000+ WooCommerce themes on TemplateMonster in different categories. They provide high-quality digital products that will dramatically improve your site’s performance.
Step 3: Upload and Activate the WooCommerce Bookings Extension
The WooCommerce Bookings Extension is a premium tool. You need to purchase and download it from the WooCommerce website.
After that, from your WordPress dashboard, go to Plugins → Add New → Upload Plugin.

Select the downloaded file from your PC and click Install Now.
Step 4: Create Bookable Products and Services
Now you can create bookable products and services for your site. From your WordPress dashboard, go to Products and click on Add New.
Insert product details and essential information. Then, choose Bookable Product as the product type. You’ll find the option under Product Data.
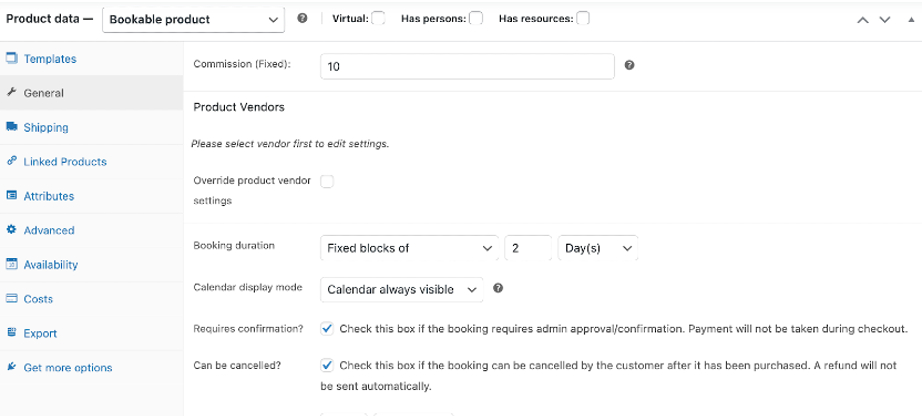
Here, you’ll find other options to configure your product or service. Under every tab, there are various customization fields. You can check the official documentation of WooCommerce bookings to learn more about these fields.
Here are some configuration options to customize your booking process:
- If applicable, then enable resources like rooms and staff members for your booking site. Set costs and availability for each resource
- Define base costs, extra costs per person or hour, and pricing rules.
- Develop general rules of availability, which might be limited to weekdays or specific time slots.
- Allow special custom availability rules for holidays and events
- Transform the appearance of a calendar, specify time intervals and define how much prior notice you want to make for reservation before it actually starts.
- Make the necessary changes in your booking form so it can become a source of information provided by customers. Moreover, include custom fields for specified details that pertain to your business.
- Include popular payment gateways to your booking site. In WooCommerce → Settings → Payments, set up the preferred payment methods.
- Personalize confirmation emails to ensure a smooth customer experience.
These actions will make your booking system look professional and optimize it.
After all the configurations, publish it on your website. Therefore, your site’s front end enables customers to conveniently schedule the needed product or service.
Important Note: Test the booking process in your WooCommerce booking site before going live. Ensure that clients can easily choose dates and times, make purchases without a hassle.
Extend Your Booking Site Functions with the Dokan Multivendor Marketplace Plugin
WooCommece lets you build only single vendor stores, and so does the WooCommerce Bookings extension. You can extend the functionality by setting up a marketplace like Zillow or Airbnb. Luckily, Dokan allows you to build a multi-vendor marketplace where vendors can sell their products or services.
Dokan is a marketplace plugin for WordPress with 60k+ active users. Where WooCommerce lets you add eCommerce features to your WordPress site, Dokan turns your single store into a full-fledged multi-vendor marketplace.
To create a booking marketplace, you need the Dokan Pro version. As you’ve already installed the WooCommerce Bookings extension, you only need to activate the Dokan Bookings module.
After activating the Dokan plugin, go to WP dashboard → Dokan → Modules. Search for WooCommerce Booking Integration and turn on the toggle button to activate this module.

Once you’ve activated the module, it’ll allow your vendors to create bookable products for their stores.
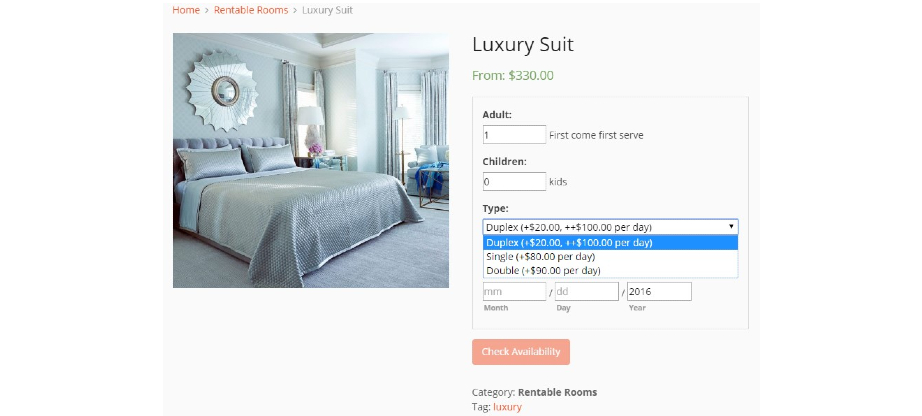
To create bookable products, navigate to Vendor Dashboard → Bookings and click on the Add New Booking Product button.
It gives you a form similar to creating a new product with all the options to create a new booking product. You can also add extra resources to your bookable products, like an extra pair of pillows or new bedsheets for your hotel room.
Note: The fields are the same as in WooCommerce. The difference is that Dokan provides those fields in the frontend vendor dashboard.
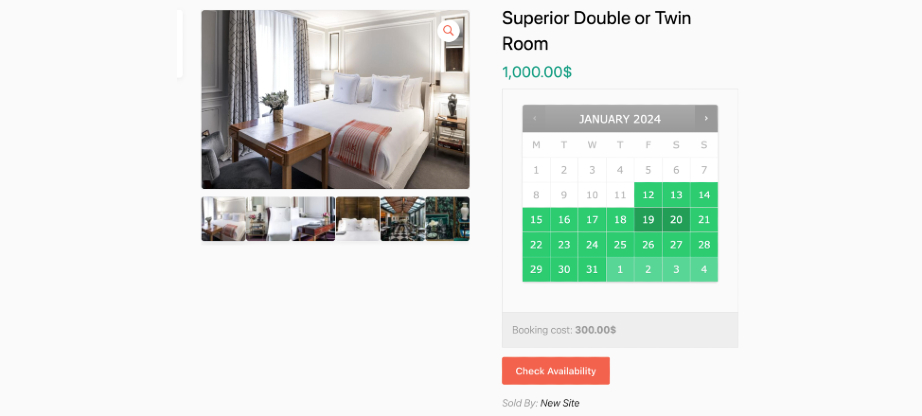
Below, you’ll find the customer view of your WooCommerce booking marketplace.
This is the way you can set up the booking feature for your multivendor marketplace.
Additional WooCommerce Booking Plugins and Extensions
You can utilize other WooCommerce tools to enhance the functionality of your booking site. For example, use the WooCommerce Accommodation Bookings extension to handle hotel or resort bookings.
The Bookings for WooCommerce plugin helps you schedule and manage appointments for services like salons, spas, and clinics.
These additional tools add more features and capabilities to your booking site. It helps you meet your customers’ specific booking requirements.
Conclusion
The major advantage of having a booking website is that it can simplify the process of making reservations or appointments. This can result in more sales and happy customers.
Follow the steps that we have discussed above and create a WooCommerce booking site. It is possible to install Dokan and turn your single store into a bookings marketplace as well. Thus, other sellers will be able to supply services via your platform. You will then get commissions from their sales.
So, why are you waiting? Get started with your WooCommerce booking site powered by WordPress today!